Newsletters
Pubblish has a built-in email tool for signing up readers and sending them regular updates. You find it under Newsletters in the Marketing section of the sidebar. From there you can manage subscribers, send campaigns, run automated sequences, and send from your own domain. This guide covers each of those tasks.
The Newsletters dashboard
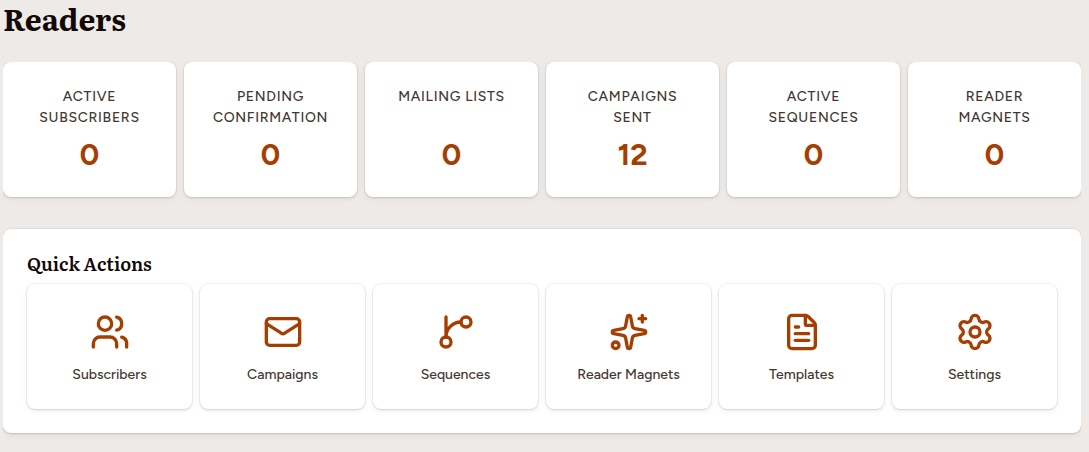
Open Newsletters in the sidebar to reach the dashboard. The top of the page shows six count cards: Active Subscribers, Pending Confirmation, Mailing Lists, Campaigns Sent, Active Sequences, and Reader Magnets.
Below the cards is a Quick Actions row. Each card opens one area of the tool:
| Card | Opens |
|---|---|
| Subscribers | Your subscriber list |
| Mailing Lists | Your lists, each with its own sender identity |
| Tags | Labels for grouping subscribers |
| Campaigns | One-off email campaigns |
| Sequences | Automated welcome sequences |
| Reader Magnets | Free downloads for new signups |
| Signup Forms | Signup forms and their landing pages |
| Link Triggers | Click-to-tag links for your emails |
| Templates | Reusable email designs |
| Settings | Sender details, your own domain, and plan limits |
A Mailing Lists table and a Recent Campaigns table appear on the dashboard once you have data.
Managing subscribers
From the dashboard, open the Subscribers card. The page lists each subscriber with their Email, Name, Status, List, and the date they subscribed. Use the search box and the Status dropdown at the top, then click Filter to narrow the list. Click any subscriber’s email address to open their detail page.
A subscriber’s status is one of five values:
- Pending Confirmation — they signed up but have not confirmed yet.
- Active — they confirmed and will receive your emails.
- Unsubscribed — they opted out.
- Bounced — their address rejected a delivery. Pubblish stops sending to them.
- Complained — they reported an email as spam. Pubblish stops sending to them.
New subscribers join through a signup form and confirm by email. When someone signs up, Pubblish creates them as Pending Confirmation and sends a confirmation email. They become Active only after they click the link in that email. This double opt-in step keeps unconfirmed addresses off your list and protects your sending reputation.
Signup forms and landing pages
Signup forms are how readers join your list. Open the Signup Forms card, then click New Signup Form.
Every form gets its own landing page — a ready-made signup page on your Pubblish site. The Landing page column on the Signup Forms page shows each active form’s address. An inactive form shows a dash instead, because its page is not being served. The link works anywhere: the back matter of your books, your email signature, social media profiles.
There are two more ways to show a signup form to readers:
- On your author website. Sites you build with Pubblish can include the signup form, and there are embed snippets for websites hosted elsewhere. See the websites guide.
- As a pop-up. On your site’s settings page in the websites area, tick Newsletter pop-up. Visitors see a one-time invitation after a short delay, or once they scroll partway down the page. Each visitor sees it once. The pop-up needs a signup form chosen on the same settings page, or it has nowhere to send readers.
Importing an existing list
If you already have a subscriber list from another tool, a workspace admin can import it from a CSV file: on the Subscribers page, click Import Subscribers.
The only required column is email. Optional columns are first_name, last_name, name, source, and tags. If your file has a single name column, Pubblish splits it into first and last name for you.
On the import form, choose a Mailing List, add any Tags, and fill in the Consent Attestation. It records how these people agreed to receive emails from you. The field is required. Leave Skip confirmation email unticked to send each imported person a confirmation email first.
A few limits apply: the file must be under 10MB. Duplicate and invalid email addresses are skipped. Your plan’s subscriber limit is checked before the import runs — see Plan limits below.
Exporting subscribers
A workspace admin can download the subscriber list as a CSV file: on the Subscribers page, click Export Subscribers. This is useful for backups or for moving data. Exports are limited to ten per hour.
Cleaning your list
Over time, some subscribers stop opening your emails. Sending to people who never read anything makes inbox providers less likely to deliver your emails.
The Inactive Subscribers page is a workspace admin tool. Nothing in the menus links to it yet, so go to /newsletters/subscribers/inactive/ in your browser. It lists everyone who has not opened an email in 180 days and has received at least three emails. From that page you can:
- Export CSV — download the inactive list.
- Send Re-engagement — create a campaign to get them reading your emails again.
- Bulk Unsubscribe — remove them all from your active list at once.
Bulk Unsubscribe cannot be undone, so export the list first if you want a record.
Unsubscribed and bounced readers do not count toward your plan’s subscriber limit, so bulk-unsubscribing inactive readers also lowers your subscriber count.
Using more than one mailing list
Most authors need one list. A second list is worth adding when a group of readers should get different emails — an advance reader team, or a separate newsletter per pen name.
Open the Mailing Lists card to see your lists, and click a list’s name to edit it. Each list can have its own:
- Reply-to email and Reply-to name — where replies to this list’s emails go.
- From name — the sender name readers see, if different from your workspace default.
- Sender address suffix — gives the list its own sending address. A suffix of
arcssends from[email protected]instead of[email protected]. With a verified custom domain, the suffix becomes the whole address:[email protected].
A subscriber belongs to one list. Campaigns and sequences send to the list you choose.
Creating and sending a campaign
A campaign is a single email sent to your subscribers. Open the Campaigns card, then click New Campaign.
Fill in the campaign form:
| Field | What it does |
|---|---|
| Name | An internal name for your reference only. |
| Mailing list | Who receives it. Leave empty to send to all active subscribers. |
| Subject | The subject readers see in their inbox. |
| Preview text | Optional text shown after the subject in the inbox. |
| HTML body | The email itself, built in the editor. |
| Text body | Optional fallback for email apps that do not show HTML. |
In the HTML body editor, use the toolbar to add bold, italics, headings, and lists. The template picker on the left lets you start from a saved design. Use the Variables dropdown to insert personalization tags, such as the reader’s name.
Under Targeting, the Include tags and Exclude tags boxes narrow who receives it. Leave both empty to reach everyone on the list.
Save the campaign to open its detail page. While its status is Draft, these buttons appear:
- Edit — change the campaign.
- Preview — see the finished email.
- Send test to myself — send the finished email to your own login address, so you can check it in a real inbox. Test sends do not affect your statistics or your subscribers.
- Send Now — send it right away.
Send Now needs a postal address on file. Anti-spam law requires one in the footer of every email. Until you fill in Physical address on the Newsletter Settings page, the button reads Add postal address to send instead. Click it and fill the address in without leaving the campaign.
If sending is paused for your workspace, no send button appears at all. The page says Sending is paused for this workspace.
When you click Send Now, Pubblish asks you to confirm the recipient count, then starts sending. After it goes out, the campaign page shows delivery statistics: Sent, Delivered, Opened, Clicked, and any bounces or complaints. A Link Clicks table below the statistics shows each link in the email with its Unique Readers and Total Clicks, so you can see which link readers actually followed.
If a campaign is scheduled and has not yet gone out, its detail page shows a Cancel Schedule button. It puts the campaign back in your drafts, and nothing has been sent.
While a campaign is going out, the page shows Stop Sending instead. Anyone already emailed keeps their copy, and the campaign cannot be restarted.
Resending to readers who missed it
Three days after a campaign is sent, a Resend to Non-Openers panel appears on its detail page. Give the resend a new subject line and click Create Resend Draft. The draft goes only to recipients who never opened the original. Review it and send it like any other campaign. Each campaign can be resent once.
Automating a welcome sequence
A welcome sequence is a series of emails that go out automatically. Open the Sequences card, then click New Sequence.
On the sequence form, give it a Name and an optional Description, and tick Active. Only active sequences send emails, so you can build one fully before turning it on.
The Trigger dropdown sets who enters the sequence:
- When someone joins a mailing list — the classic welcome series for new subscribers.
- When a tag is added to a subscriber — the sequence starts whenever a reader gets a particular tag. Choose the tag in the Trigger tag field. Combine this with a link trigger (below) and readers can enroll themselves by clicking a link.
Open the sequence and click Add Email to add a step. Each email has:
- Sort order — its position in the series.
- Delay days and Delay hours — how long after the previous step it sends. The first email can use zero delay to send straight away.
- Subject and Preview text.
- HTML body and an optional Text body.
- An Active tick that controls whether this single email sends.
On the sequence page, the emails appear as a numbered timeline. Each one has an Edit button, a Preview button, and a Toggle active status button that pauses or resumes that single email. The preview page also has a Send test to myself button, so you can check a sequence email in your own inbox before it ever reaches a reader. Pausing an email stops it from sending without deleting it.
To remove a whole sequence, use Delete Sequence in the Danger Zone at the bottom of the sequence page. This cannot be undone.
Tagging readers with link triggers
A link trigger is a special link you paste into an email. When a reader clicks it, Pubblish tags them and sends them on to a page you choose. It replaces a survey question. Write “Want early copies? Click here.” Everyone who clicks gets the tag.
Open the Link Triggers card, then click New Link Trigger. Give it a name, the destination address the reader should land on, and the tag to apply.
Each trigger has a Placeholder — a short code like {{link:arc-list}}. Copy it from the trigger’s page and paste it into a campaign or sequence email where the link should go. When the email is sent, the placeholder becomes a working link, personal to each reader.
The Link Triggers page shows each trigger’s Clicks and how many readers were Tagged. Pair a trigger with a sequence that starts When a tag is added to a subscriber, and one click enrolls the reader in an automated series.
Offering a reader magnet
A reader magnet is a free file you give people for subscribing — a sample chapter, a short story, a map of your world. Readers get a download link by email as soon as they confirm their subscription.
Open the Reader Magnets card on the Newsletters dashboard, then click New Magnet.
Magnet Details
- Name — what you call it internally. Readers never see this.
- Description — readers see this, in the download email.
- Active — turn a magnet off without deleting it. Only active magnets are given out.
- Available until — the last day the magnet is offered to new subscribers. The date itself counts, so “31 March” means all of the 31st. Leave it blank to keep the magnet running. Readers who already have a link keep it after the end date.
Title and Files
- Title and Edition — optional. Pick a book. The Files list below narrows to that book’s files, plus any file that is not linked to a book. Pick an edition to narrow it further. The book you choose also supplies the cover shown on the signup page.
- Files — the files readers get. Choose more than one if you like. An EPUB and a PDF together work on any device. Each file you pick appears under Selected Files beside the list.
Files come from your assets library. See the assets guide for uploading them.
What can and cannot be a magnet
The Files list only offers file types a reader can open.
| Kind | Formats |
|---|---|
| Documents | PDF, EPUB, plain text, Markdown |
| Images | JPG, PNG, GIF, WebP, TIFF |
| Audio | MP3, M4A, M4B, WAV, FLAC |
Images are included because a map, a character portrait or a family tree can be the whole magnet.
Some files can never be sent, however you file them:
- Anything in a confidential category — Manuscript, Uncategorized, Contract, Tax Forms, Banking, Correspondence. A manuscript is a working document, not something to hand out. Uncategorized is where Pubblish files a document it cannot identify from its filename. To give away a book you have written, convert it first and offer the built EPUB or PDF, which Pubblish files under Edition Files. A new build starts as Draft — set it to Final on the file’s panel in Assets and it can be offered.
- An Edition Files file that is not marked Final. It shows grayed out with the reason; set it to Final in Assets to offer it.
- File types a browser should not be handed, such as Word documents, InDesign files and SVG.
A confidential file still appears in the Files list, grayed out, with the reason on the row. You cannot pick it. An owner or an admin can change its category in the Confidential files section below the list — Pubblish asks them to confirm first. You can also change it on the file’s page in Assets. If a file does not appear in the list at all, it is the wrong file type for a magnet.
If you move an already-attached file into a confidential category, Pubblish stops sending it. The file stays attached, grayed out in the picker. Readers are not shown its name. Change its category back to start sending it again.
What the reader gets
Every reader gets five downloads per file, pooled. A one-file magnet gives five downloads; a two-file magnet gives ten, to spend across both files however the reader likes. Their link works for 30 days from the day they sign up. Both numbers are the same for every workspace and there is nothing to set.
A one-file magnet downloads straight from the link in the email. A magnet with several files opens a page of buttons instead, one per file.
Giving the magnet out
A magnet is delivered by a signup form. Open the Signup Forms card and edit the form you want. Choose the magnet in the Reader magnets field. One form can offer several magnets. The magnet’s own page lists every form using it under Delivered By.
Re-sending a download link
Emails get lost. Links expire. Open the reader’s page from the Subscribers list. Under Downloads you will see each magnet they were sent, with 1 download left, Link expired or All downloads used beside it.
Click Send again to give them a fresh 30 days and a full set of downloads. The link in their original email starts working again too, so they can use whichever copy they find first.
Send again appears only for readers you can still email, and only if you can edit newsletters. It is hidden for anyone who has unsubscribed, bounced or reported spam.
Email templates
Templates are reusable email designs. Open the Templates card to reach the Email Templates page.
Templates marked with a Starter badge are provided by Pubblish and are read-only. For a starter template you can Preview it, or Duplicate to customize it, which makes an editable copy you own.
Your own templates show three actions: Preview, Edit, and Delete. Click New Template to create a new one. Your templates appear in the template picker when you compose a campaign.
Sender settings
Open the Settings card to reach the Newsletter Settings page. Under Sender Information you control how your emails are addressed:
- From name — the name shown in the “from” field of your emails.
- From Email — the address your emails send from. It is based on your workspace subdomain, unless you verify your own domain (below).
- Reply-to email — where replies from readers go.
- Physical address — a postal address required by anti-spam law. It appears in the footer of every email.
Click Save Settings to keep your changes.
Sending from your own domain
By default your emails send from your workspace’s address on Pubblish’s sending domain. You can send from a domain you own instead — [email protected] — which puts your own name on every email, and means inbox providers judge your emails by your domain’s own sending history. You need to be able to add DNS records for the domain.
On the Newsletter Settings page, find the Custom Sending Domain card:
- Enter your domain under Your domain and the address part you want under Send from, then click Use my own domain.
- The card shows two DNS records: DKIM (TXT record) and Return-Path (CNAME record), each with a Name and a Value and a Copy button. Add both records with your DNS host — usually the company where you registered the domain.
- Click Check verification. DNS changes can take up to an hour to spread, so it may take a few tries. Pubblish also re-checks automatically every hour, so verification completes on its own once the records are in place.
Each record shows a Verified or Pending badge. Once both are verified, your emails send from your domain — nothing else to switch on. Until then, and any time verification is lost, your emails simply keep sending from your workspace’s standard address. Sending never stops while a domain is half set up.
Remove domain switches your emails back to the standard address straight away. If you add the domain again later, you will need to verify the DNS records again.
Plan limits
The cards on the right of the Newsletter Settings page show your Plan Limits:
- Monthly Email Limit — how many emails you have sent this month, against your plan’s monthly allowance.
- Max Subscribers — your plan’s subscriber limit. Only people you can actually mail count toward it: active subscribers and pending confirmations. Unsubscribed and bounced readers stay in your records but do not count toward it.
- Max Lists — how many mailing lists your plan allows.
- Max Tags — how many subscriber tags your plan allows.
Signups, imports and manual additions are all checked against the subscriber limit. If you reach the limit, imports and new signups are declined, and the message on screen explains your options, including exporting your list as a CSV. Signup links printed in your books keep working — they point at your own Pubblish site, not at an email provider.
The same cards show your sending Reputation: total sent, bounce rate, and complaint rate.
Related Topics
- Assets — upload the files you deliver as reader magnets.
- Conversions — build the EPUB or PDF you give away, rather than sharing a working manuscript.
- Websites — add your signup form or pop-up to your author site.
- Settings & account — manage your workspace and plan.